Last Modified June 7, 2024
- Home
- eCommerce
- 2Checkout (Verifone)
- 2Checkout Configuration
2Checkout Product Configurations
To allow Subscription Licenses, your 2Checkout account must be set-up to allow Subscriptions -
please request this from your 2Checkout Account representative.
Your 2Checkout Products that you want connected to software_DNA
can be configured as:
- regular or non-Subscription products - Perpetual Licenses are issued
- a Subscription with "One-Time-Biling" Pricing - a Perpetual License is issued in software_DNA
- a Subscription with "Recurring Billing" Pricing - a Subscription License is issued in software_DNA
Configuration of the Electronic Delivery Dynamic List
The software_DNA Connector acts as a Dynamic Key List generator which is defined globally in your 2Checkout
account, and is then assigned to each Product that you want connected to DNA.
The Dynamic Key List action will retrieve a new License Activation Code from the DNA Servers during the Ordering process.
To create a software_DNA Dynamic Key List :
- in the main menu, select Setup -> Fulfillment , and click on the
Electronic Delivery tab
in the Add New Code List section:
- enter a name for the Code List (ex: software_DNA)
- for List Type, choose Dynamic list option
- click on Add
- in the Edit delivery code list page, click on Set URL to start a 4-step process
that will validate the URL and save it:
- Step 1: enter the following URL:
For URL, please access via your DNA Control Panel account, or Register for a "No-Obligation" account at www.softworkz.com
Note that the previous Avangate Connector URL continues to be supported
- Step 2: chose SHA2 for the hashing algorithm
- Step 3: choose one of your products for this validation, and
enter Buyer info, or use default values and click on Step 4. Debug
- Step 5: once validated, click on Save / Change URL to complete the set-up.
- The Dynamic Key List is now validated and can be assigned to the products you want connected to
software_DNA.
To assign the Dynamic Key List to one of your products:
- in the Main menu, select Setup -> Products, click on the Product, and click
on the Fulfillment tab
- for Product Fulfillment Type, choose Fulfillment made through 2Checkout delivery option
- for Content & Methods:
- for Delivery Content, choose Electronic code / key / binary file
option
- for Delivery Methods, choose
By email & in 2Checkout myAccount option
It is recommended to also choose the Instant Delivery in Thank You page option
- in the Activation codes setting section, select the list previously created from the
drop-down menu (ex: software_DNA)
- click on SAVE at the bottom of that screen
- note the 2Checkout Product ID displayed that will be used in the DNA Connector configuration
Configuration of the IPN Notification
The IPN Notification allows for:
- completing the setting of the License Activation Code parameters
- increased pricing flexibility directly from your 2Checkout settings, allowing you to change your retail pricing in 2Checkout,
add volume discount tables, add special promotions knowing that the software_DNA Activation Fee will be calculated
correctly based on your latest pricing strategy.
- for Subscriptions, this will allow Renewal notifications to be received by software_DNA
To set-up the IPN Notification for your account:
in the Main menu, select the Integrations -> WebHooks & API,
and click on the IPN Settings tab
note the 2Checkout Secret Key - this will be required to configure the DNA Connector
click on Add IPN URL to add a IPN URL:
- scroll down to the General IPN Settings -> Triggers section, and ensure the following are selected:
- Authorized and Approved Orders (sent after Electronic Delivery)
- Reversed and Refunded Orders
- scroll down to the Response Tags section, use the default selections and add the following fields:
- IPN_LICENSE_TYPE[]
- IPN_LICENSE_REF[]
- IPN_LICENSE_EXP[]
- IPN_LICENSE_LIFETIME[]
- TEST_ORDER
List of minimum fields required
- click on Save/Update
- click on the WebHooks & API tab
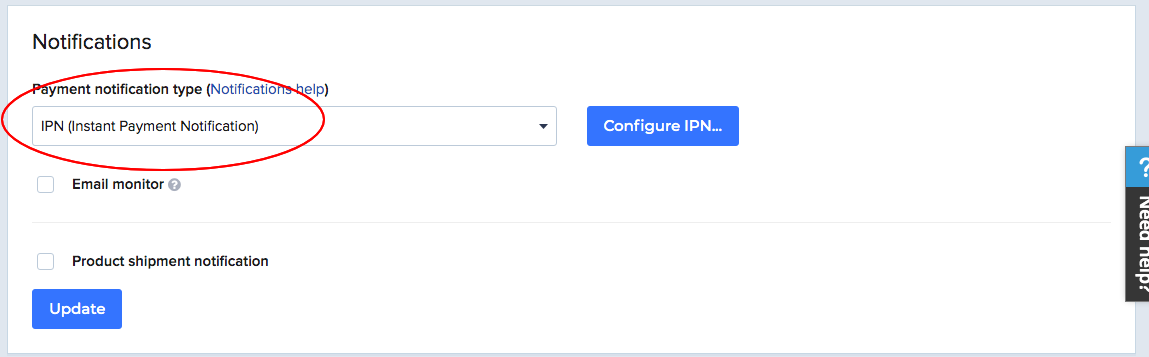
- scroll down to the Notifications section
- from the Payment Notification Type drop-down list
select IPN (Instant Payment Notification) or Email Text & IPN
- click Update
Configuration of the LCN Notification
The LCN Notifications are used to support 2Checkout Subscriptions and allows software_DNA to automatically
ban/disable a license code once a 2Checkout Subscription is cancelled, or un-ban the License code if the Subscription
is re-instated.
If you do not enable this option, then the License Code will still be valid and you would need to manually
ban/disable the License Code yourself from the DNA Control Panel.
To enable the LCN Notification for your account:
in the Main menu, select Integrations -> WebHooks & API
and click on the LCN settings tab
click on Add LCN URL to add a LCN URL:
- scroll down to the General LCN Settings -> Triggers section, and ensure the following are selected:
- scroll down to the Response Tags section, use the default selections and add the following fields:
- FIRST_NAME
- LAST_NAME
- EMAIL
- TEST
- LICENSE_PRODUCT
- LICENSE_LIFETIME
- ACTIVATION_CODE
- STATUS
- click on Save/Update
See Testing your Configuration for details on how to test the notifications.